
Burpsuite Walkthrough
Burpsuite is one of the best tools available for web application testing. Its wide variety of features helps us perform various tasks, from intercepting a request and modifying it on the fly, to scanning a web application for vulnerabilities, to brute forcing login forms, to perfoming a check for the randomness of session tokens and many other functions. In this article we will be doing a complete walkthrough of Burpsuite discussing all its major features.
Burpsuite (free edition) is available by default in Backtrack 5. The professional edition can be downloaded from here. Some of the features that are not available in the free edition are Burp Scanner, Task Scheduler, Target Analyzer etc. Overall it has the following features.
1) Proxy - Burpsuite comes with a proxy, which runs on port 8080 by default. Using this proxy, we can intercept and modify the traffic as it flows from the client system to the web application. In order to use this proxy, we have to configure our browser to use this proxy. We can also drop the packets if we want so that they do not reach their intended destination, redirect the traffic to a particular host etc.
2) Spider - The spider feature of Burpsuite is used to crawl web applications looking for new links, content etc. It automatically submits login forms (through user defined input) in case it finds any, and looks for new content from the responses. This information can then be sent to the Burp Scanner to perform a detailed scan on all the links and content provided by the spider.
3) Scanner - It is used to scan web applications for vulnerabilities. The type of scanning can be passive, active or user-directed. Some false positives might occur during the tests. It is important to remember that no automated scanner is 100 percent accurate in its results. Unfortunately Burp Scanner is not available with the Free edition that is included in Backtrack 5.
4) Intruder - This feature can be used for various purposes like exploiting vulnerabilities, fuzzing web applications, carrying out brute force attacks etc.
5) Repeater - This feature is used to modify and send the same request a number of times and analyze the responses in all those different cases.
6) Sequencer - This feature is mainly used to check the randomness of Session tokens provided by the web application. It performs various advanced tests to figure this out.
7) Decoder - This feature can be used to decode data to get back the original form, or to encode and encrypt data.
8) Comparer - This feature is used to perform a comparison between any two requests, responses or any other form of data. This feature could be useful when comparing the responses with different inputs.
1) Proxy
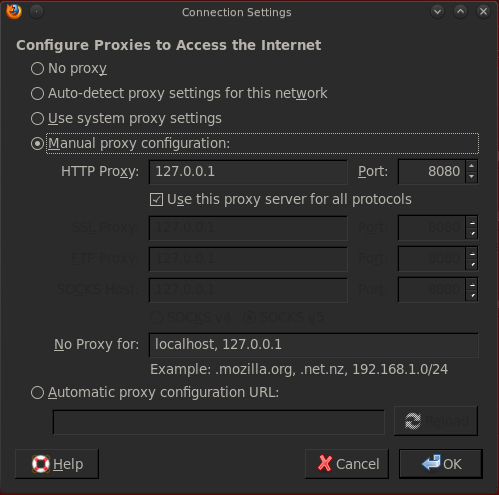
The proxy feature allows us to intercept and modify requests. In order to intercept the requests and manipulate them, we must configure our browser to direct its traffic through Burp’s proxy, which is 127.0.0.1:8080 by default.
Once this is done, open up Burpsuite, go to Proxy–>Intercept and make sure Intercept is on.

Go to the alerts tab, we can see that a proxy service is running on port 8080. We can also change this configuration by going to the options tab under proxy.

Let’s have a look at all the options we have while running the proxy, go to the options tab under proxy

Here we can edit the port the proxy is listening on, and even add a new proxy listener. Burp also has option of presenting certificates to SSL protected websites. By default, Burp creates a self signed CA certificate upon installation. The current checked option, i.e generate CA-signed per-host certificates will generate a certificate for the particular host we are connecting to signed by Burp’s CA certificate. The only thing with which we are concerned here is to decrease the number of warnings which a user gets when connecting to a SSL protected website.
If we don’t check the listen in loopback interface only option then this means that the burp proxy can serve as a proxy for other systems on the network too. This means any computer in the same network can use this Burp proxy as a proxy and relay its traffic through it.
The support invisible proxying for non-proxy-aware client option is used for clients that do not know that they are using a proxy. This means that the option for proxy is not set in the browser, but somewhere else, for e.g in the hosts.txt file. The only issue with this is that the request in this case will be a bit different than the requests when the proxy option is set in the browser itself, and hence Burp needs to know if it is receiving traffic from a non-proxy aware client. The redirect to host, redirect to port option will redirect the client to the host and port we specify in that option.
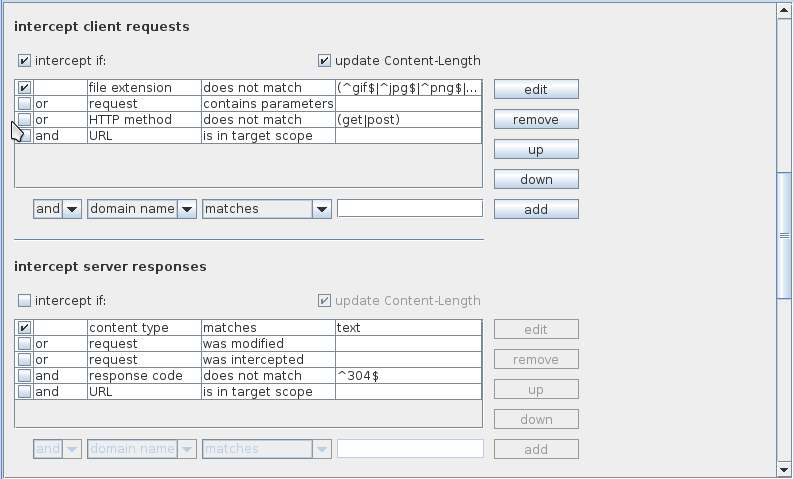
Similarly we can intercept requests and responses based on the rules we specify here. This could be a handy feature when we want to intercept only some of the requests in a very high traffic environment.
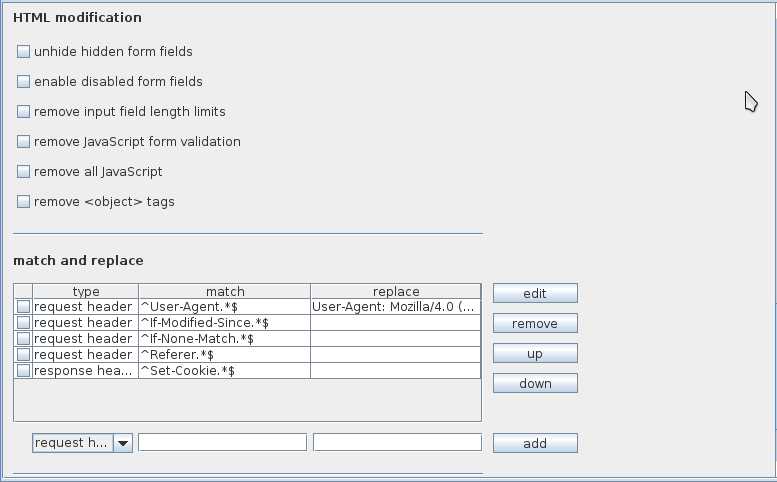
There are options for modifying HTML received from the response. We can unhide hidden form fields, remove javascript etc. Similarly there is an option for finding a specific pattern and replacing it with a custom string. We need to specify regular expressions here. Burp will parse the request or response looking for this pattern and will replace it with the custom string.
Now that we have set up Burpsuite and the configurations in our browser properly, we can intercept requests. Please note that whenever we send a request, it will be intercepted by Burpsuite and we will have to forward it manually. Hence it is advisable to keep “intercept is on” option checked only when you really want to see the contents of the packets going through.
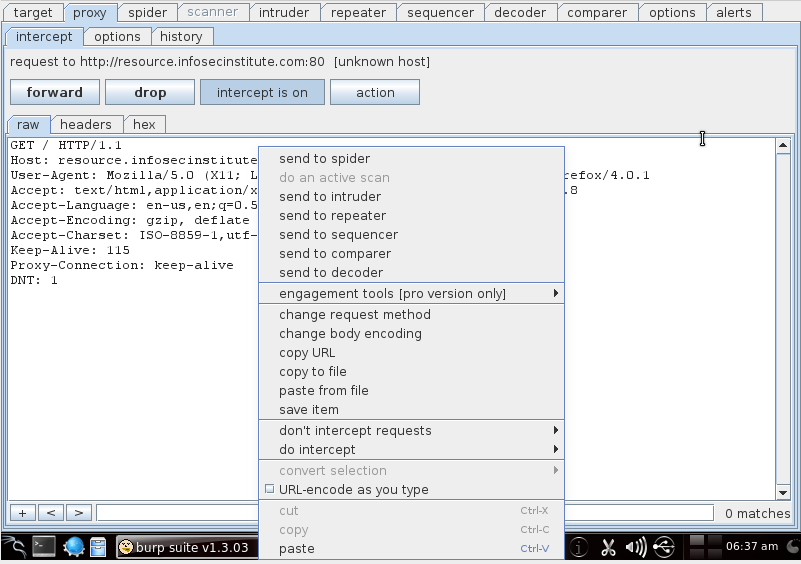
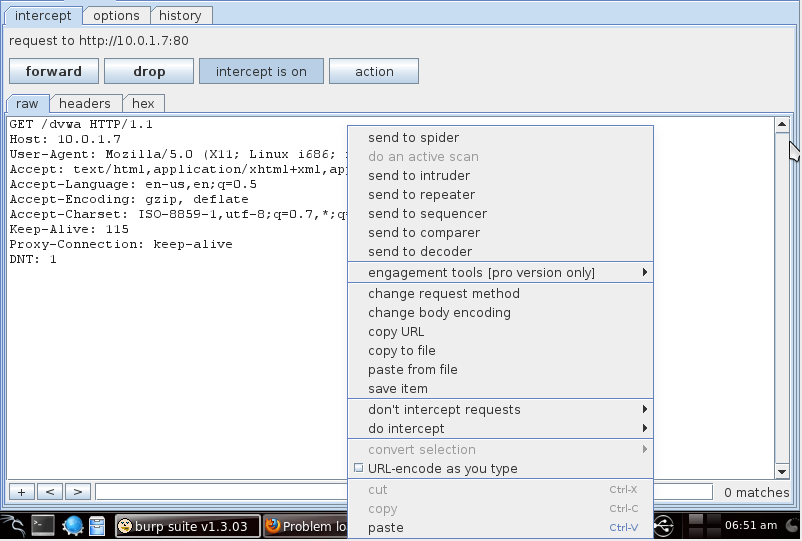
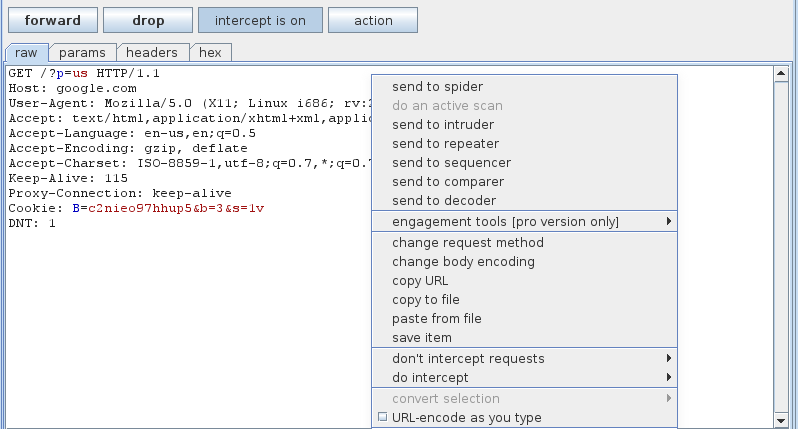
Open up your browser and start browsing. We will see that the request is being intercepted by Burpsuite. Hence our proxy is working fine, we can right click on it and send the request to various other tools in Burpsuite for analysis.
2) Spider - Burp Spider is used for mapping web application. It will automatically crawl the web application, looking for links, will submit any login forms it finds and hence provide a detailed analysis of the whole application. These links can then be passed over to Burp Scanner to perform a detailed scan using the information provided by the scanner. In this case i will be using the spider tool on DVWA (Damn vulnerable Web Application). To do that simply go to the application DVWA using your browser, make sure intercept is on in Burpsuite, and get the request intercepted by Burpsuite. Right click on the intercepted request, and click on send to spider.
Once you do this, an alert will pop up asking us to add the item to the scope. Click on Yes. A scope basically defines the target region on which we want to run our tests.

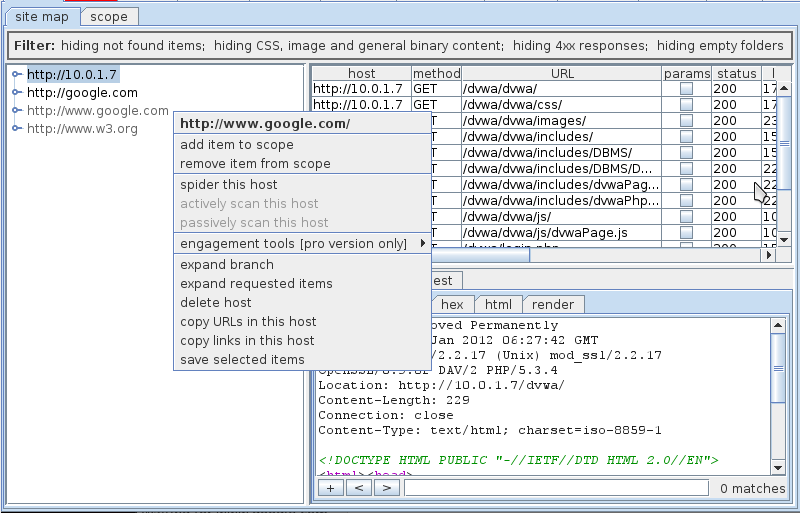
If we go to the target tab under site map, we will see that the url has been added in the target. Also we can see that some other targets like http://google.com have been added to the targets list. Burpsuite automatically adds targets as we browse the web while using Burp’s proxy. We can add the targets to our scope by right clicking on any target and clicking on add item to scope..
If we go to the Scope tab we find that the application dvwa has been added to the scope. 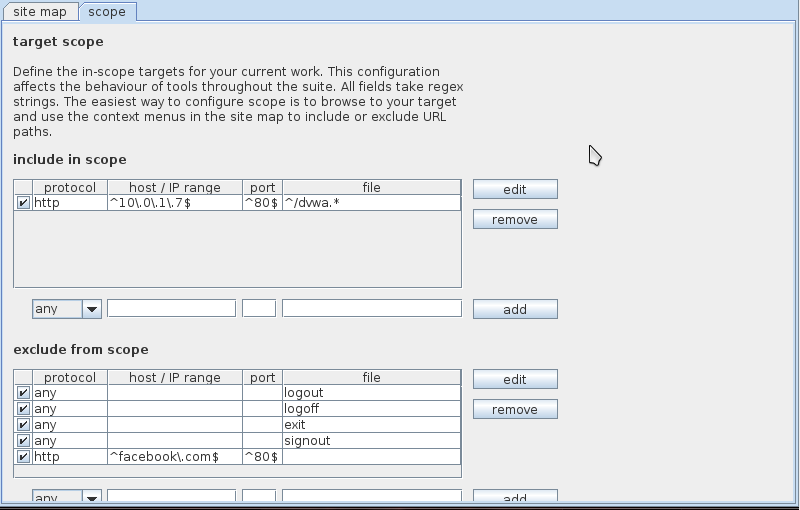
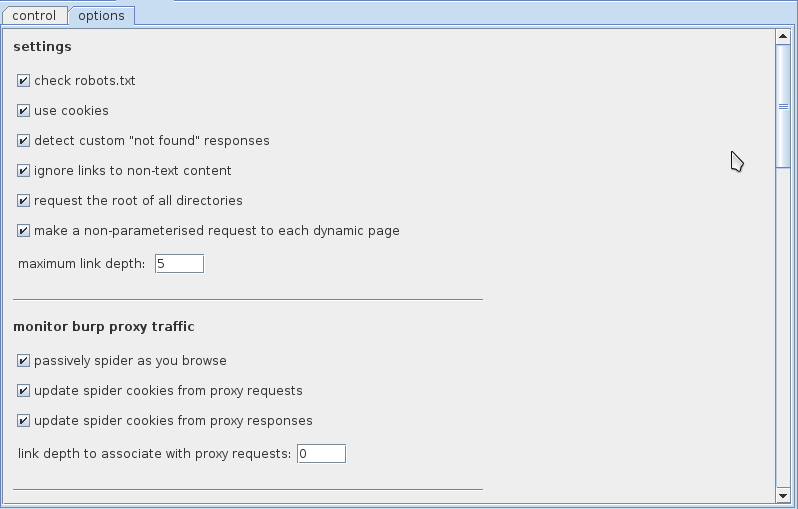
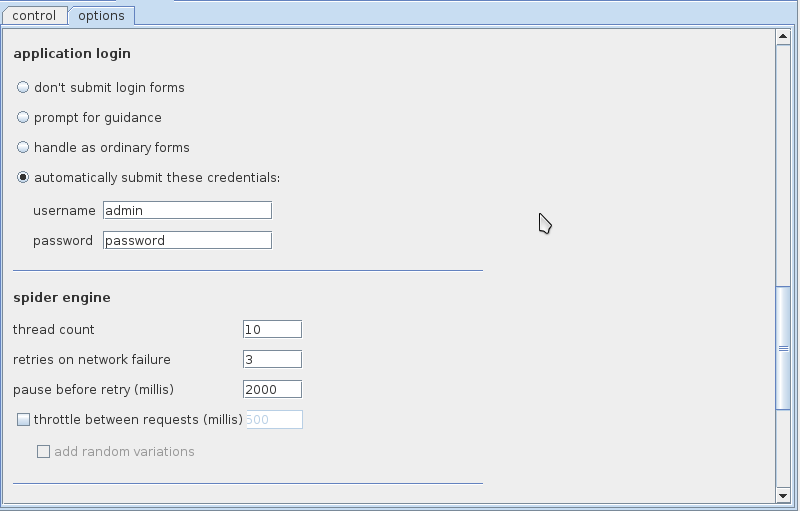
Go to the Spider tab now and click on options. Here we can set various options while running the Burp spider on the application. We can ask it to check for robots.txt file, in which it will try to crawl to the directories that the website administrator has not allowed to be indexed for search engines. Another important option is passively spider as you browse. Basically Burp Spider can be run both in passive and active mode. This asks Burp Spider to keep scanning for new links, content as we browse the web application using Burp’s proxy.
Another important option is application login. Whenever Burp Spider hits a login form while crawling, it can automatically submit the credentials that we provide to it here. I have asked Burp Spider to submit the credentials admin/password as these are the credentials used in DVWA. Hence Burp spider will submit these credentials automatically and keep crawling ahead looking for extra information. You can also change the thread count if you want.
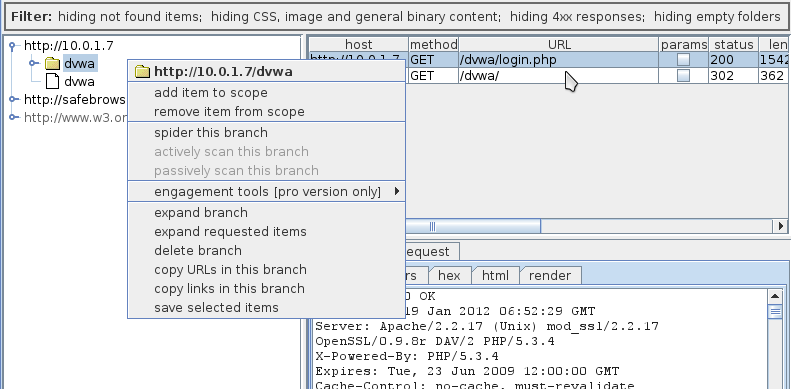
To begin spidering an application, just right click on the target to reveal the branch for DVWA (in this case dvwa) and click on spider this branch.
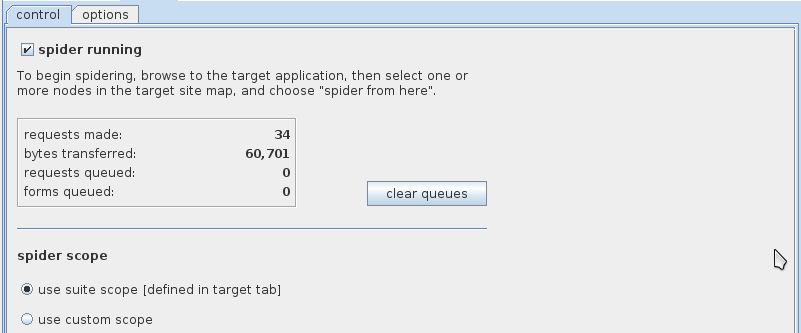
This will start the Burp Spider. If we go to the Spider control tab, we can see the requests being made. We can also define a custom scope for Burp Spider.
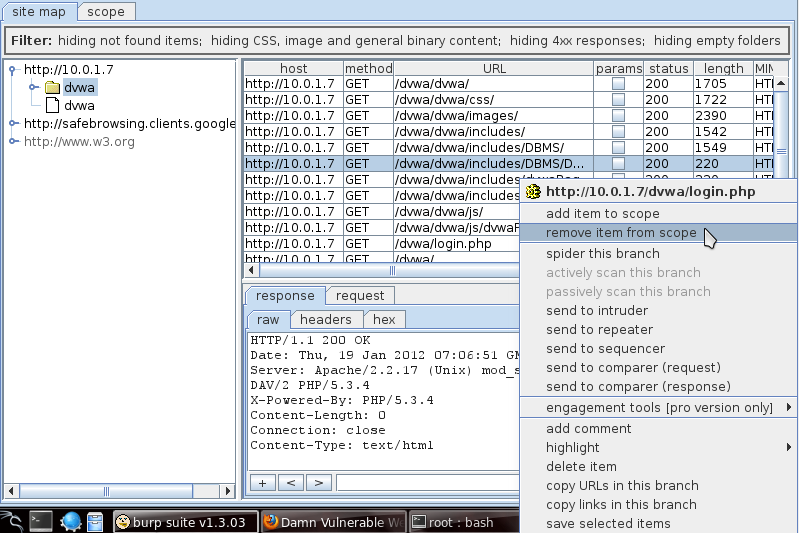
Once it has finished running, we will see a lot of new URL’s for dvwa branch. This provides us very useful information about the web application. We can then send these URLs to other Burp tools like Burp Scanner (available only in professional edition) and scan it for vulnerabilities.
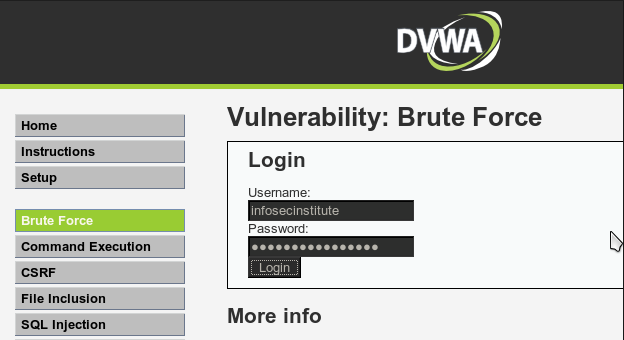
3) Intruder - Burp Intruder can be used for exploiting vulnerabilities, fuzzing, carrying out brute force attacks and many other purposes. In this case we will be using the Intruder feature in Burp Suite to carry out a brute force attack against DVWA. Browse over to DVWA and click on Brute Force. Enter any username/password, make sure Intercept is on in Burpsuite, and click on Login.
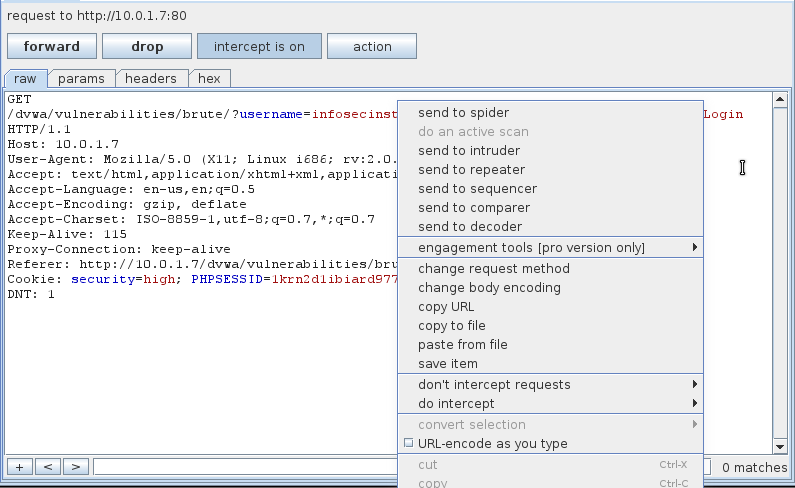
The request will be intercepted by Burpsuite, right click on it and click on “send to intruder”
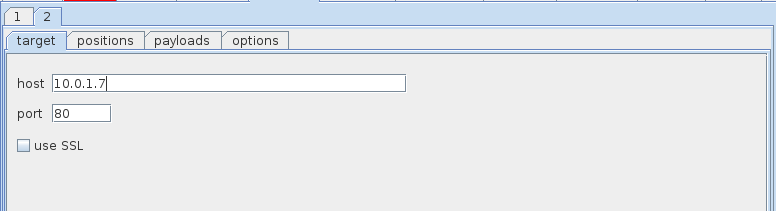
This will send the request information to the Intruder. Go to the Intruder tab. Now we will have to configure Burpsuite to launch the brute force attack. Under the target tab, we can see that it has already set the target by looking at the request.
Go to the positions tab now, here we can see the request which we had previously sent to intruder. Some of the things are highlighted in the request. This is basically a guess by Burpsuite to figure out what all things will be changing with each request in a Brute force attack. Since in this case only username and password will be changing with each request, we need to configure Burp accordingly.
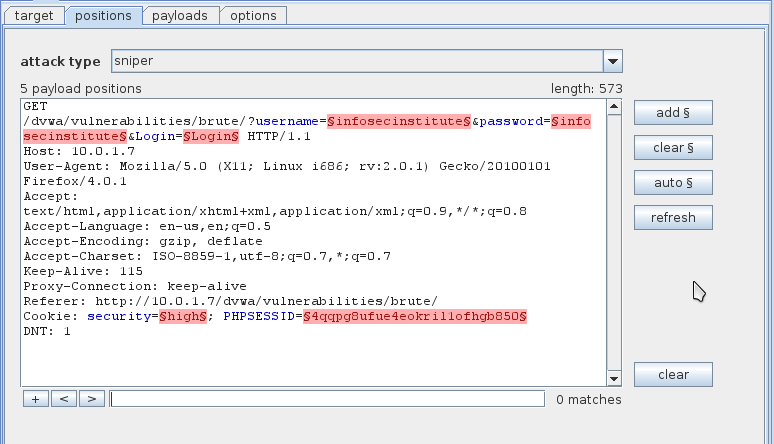
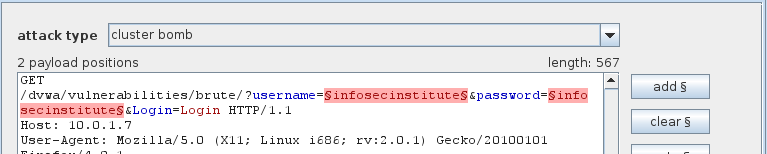
Click on the clear button on the right hand side. This will remove all the highlighted text, now we need to configure Burp to only set the username and password as the parameters for this attack. Highlight the username from this request (in this case “infosecinstitute”) and click on Add. Similarly, highlight the password from this request and click on Add. This will add the username and password as the first and second parameters. Once you are done, your output should look something like this.

The next thing we need to do is set the Attack type for this attack, which is found at the top of the request we just modified. By default it is set to Sniper. However, in our case we will be using the Attack type “Cluster Bomb”. According to Burp’s documentation from portswigger.net here is the difference between the different types of attack.
Sniper - This uses a single set of payloads. It targets each position in turn, and inserts each payload into that position in turn. Positions which are not targeted during a given request are not affected - the position markers are removed and any text which appears between them in the template remains unchanged. This attack type is useful for testing a number of data fields individually for a common vulnerability (e.g. cross-site scripting). The total number of requests generated in the attack is the product of the number of positions and the number of payloads in the payload set.
battering ram - This uses a single set of payloads. It iterates through the payloads, and inserts the same payload into all of the defined positions at once. This attack type is useful where an attack requires the same input to be inserted in multiple places within the HTTP request (e.g. a username within the Cookie header and within the message body). The total number of requests generated in the attack is the number of payloads in the payload set.
pitchfork - This uses multiple payload sets. There is a different payload set for each defined position (up to a maximum of 8). The attack iterates through all payload sets simultaneously, and inserts one payload into each defined position. I.e., the first request will insert the first payload from payload set 1 into position 1 and the first payload from payload set 2 into position 2; the second request will insert the second payload from payload set 1 into position 1 and the second payload from payload set 2 into position 2, etc. This attack type is useful where an attack requires different but related input to be inserted in multiple places within the HTTP request (e.g. a username in one data field, and a known ID number corresponding to that username in another data field). The total number of requests generated by the attack is the number of payloads in the smallest payload set.
cluster bomb - This uses multiple payload sets. There is a different payload set for each defined position (up to a maximum of 8). The attack iterates through each payload set in turn, so that all permutations of payload combinations are tested. I.e., if there are two payload positions, the attack will place the first payload from payload set 1 into position 1, and iterate through all the payloads in payload set 2 in position 2; it will then place the second payload from payload set 1 into position 1, and iterate through all the payloads in payload set 2 in position 2. This attack type is useful where an attack requires different and unrelated input to be inserted in multiple places within the HTTP request (e.g. a username in one parameter, and an unknown password in another parameter). The total number of requests generated by the attack is the product of the number of payloads in all defined payload sets - this may be extremely large.
As we can see in the image below, our attack type is set to “Cluster Bomb”.
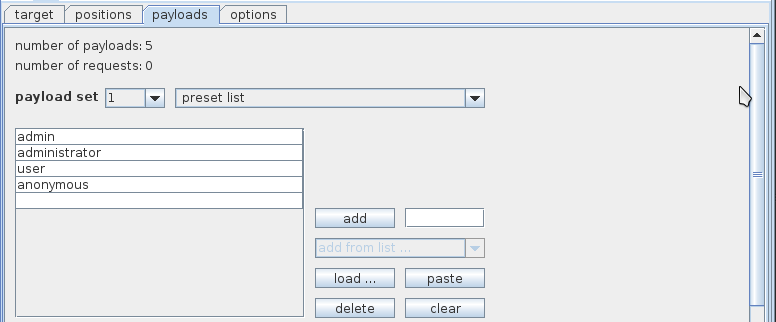
Go to the payload tab, make sure payload set 1 is selected, click on load and load the file containing a list of usernames. In my case I am using a very small file just for demonstrations purposes. Once you load the file all the usernames will be displayed as shown in the image below.
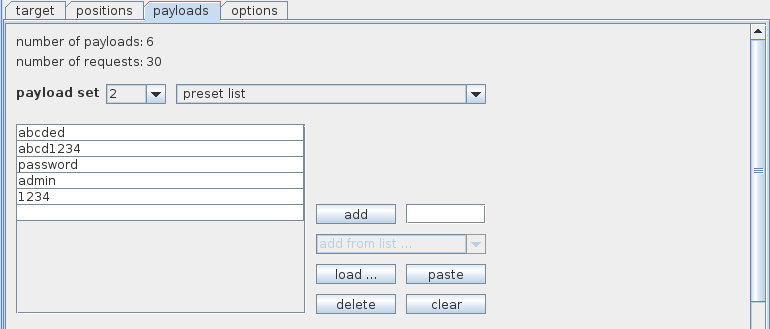
Similarly select payload set 2, click on load and load the file containing a list of passwords.
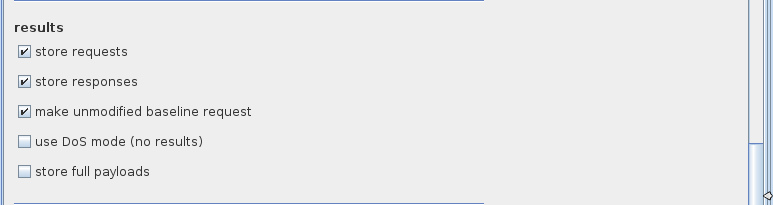
Go to the options tab now and make sure “store requests” and “store response” options are set under results. Have a look at all the options and see if you need or don’t need any of these options.
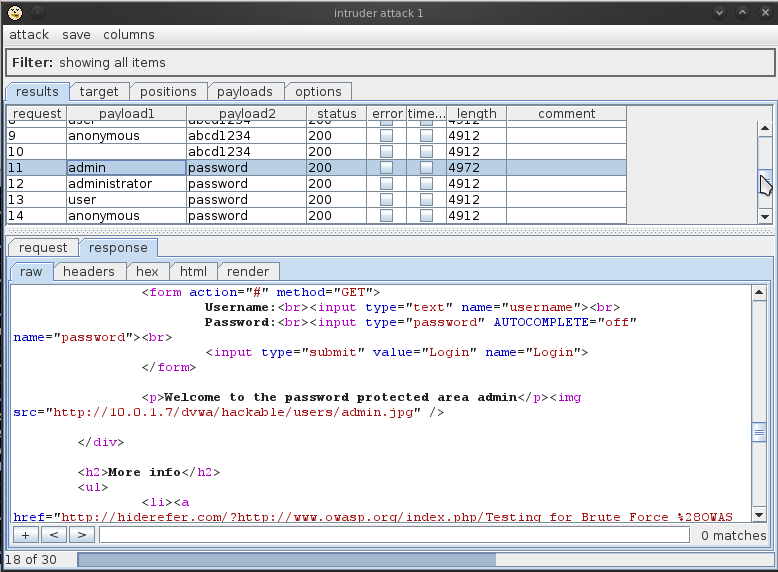
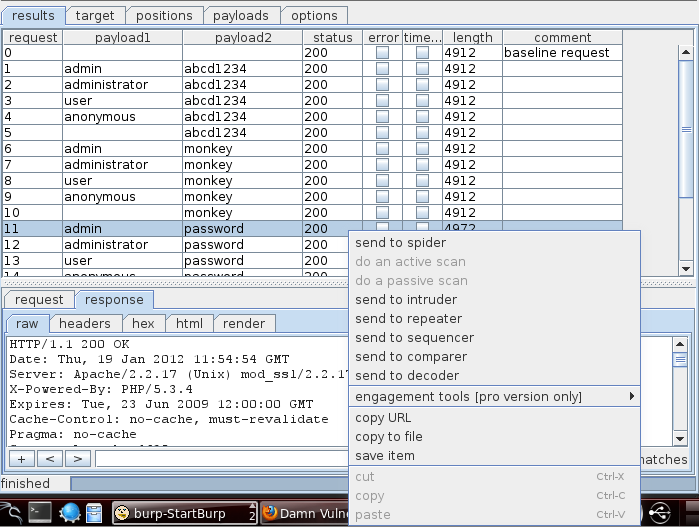
All right we are now set to launch our attack. Click on Intruder on the top left and click on start attack. We will see a window pop up with all the requests being made. So how do we know which request is successful ? Usually a successful request will have a different response than an unsuccessful request or will have a different status response. In this case we see that the request with the username “admin” and the password “password” has a response of different length than the other responses.

Let’s click on the request with a different response size. If we click on the response section, we see the text “Welcome to the password protected area admin” in the response. This confirms that the username/password used in this request is the correct one.
I recommend you explore Burp Intruder in more detail as it is one of the most powerful features available in Burpsuite.
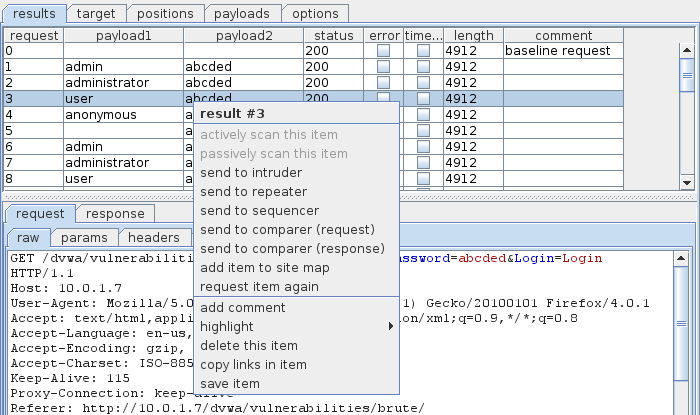
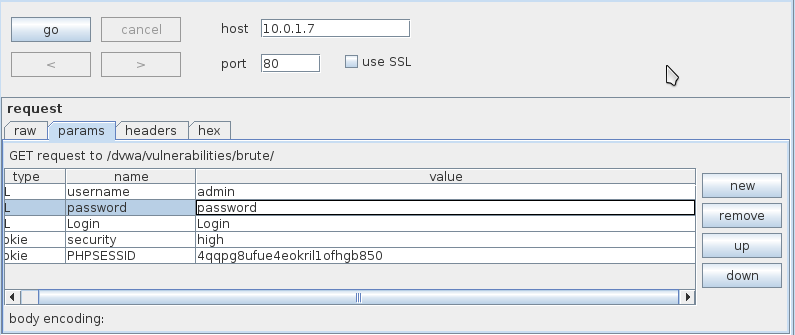
4) Repeater - With Burp Repeater, we can manually modify a request, and resend it to analyze the response. We need to send a request to Burp Repeater for this. The request can be sent to it from various places like Intruder, proxy etc. Let’s send a request to Repeater from the Intruder attack we just performed on DVWA. To send the request to the Intruder, just right click on the request and click on Send to Intruder.
If we go to the Repeater tab, we can see the request there. We also see that there are 3 tabs with the name 1,2 and 3. In Burp Repeater, a tab is used for each request.
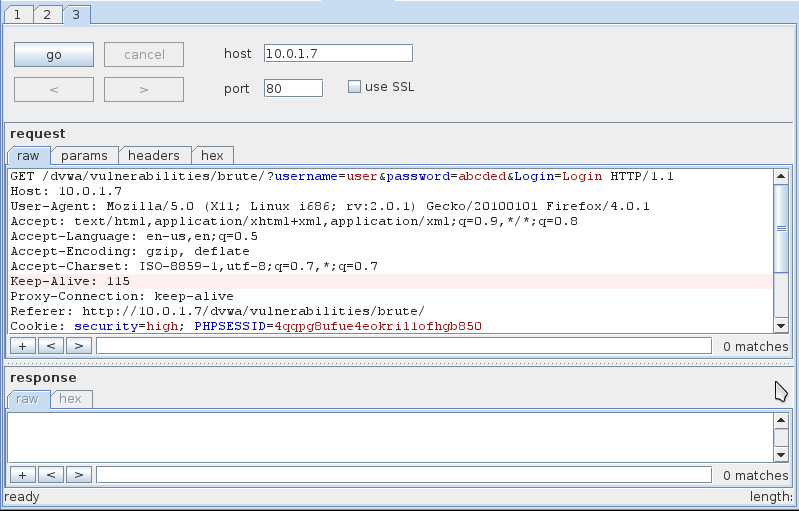
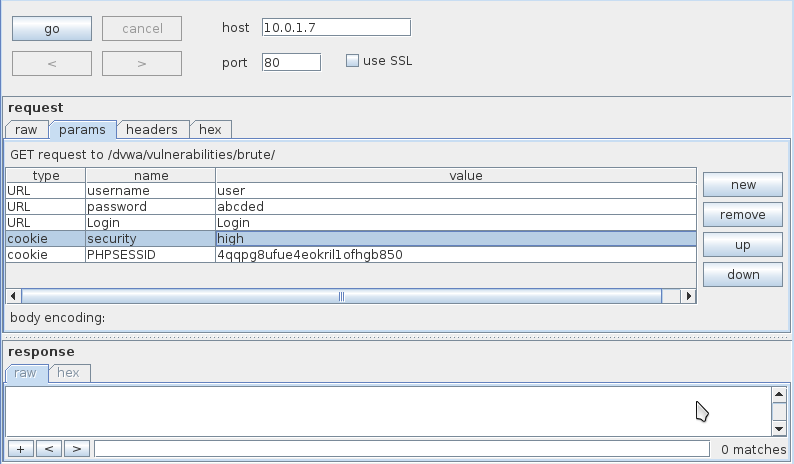
We can also see the params, header, hex and raw format of the request. We can modify any of these before sending the request.
Let’s just change the username, password to the correct one, i.e username=admin and password=password and click on Go. This will send the request.
We can analyze the response in the response section. Again we have the option to see the params, header, hex and raw format of the response. The render option displays the page as if it were displayed in a browser, though it is not fully reliable.

5) Sequencer - Burp Suite Sequencer is used to figure out the randomness of the Session tokens generated by a web application. This is because Session tokens are usually used to authenticate a user, and hence should not be compromised. It is important for a web application to have a high degree of randomness for Session tokens, so that brute force attacks are not successful against it. We need to send a request which returns a Session token to the sequencer, the Sequencer then repeatedly sends the request, thus obtaining a high number of Session ID’s. It then passes these Session ID’s through various statistical tests to determine the randomness.
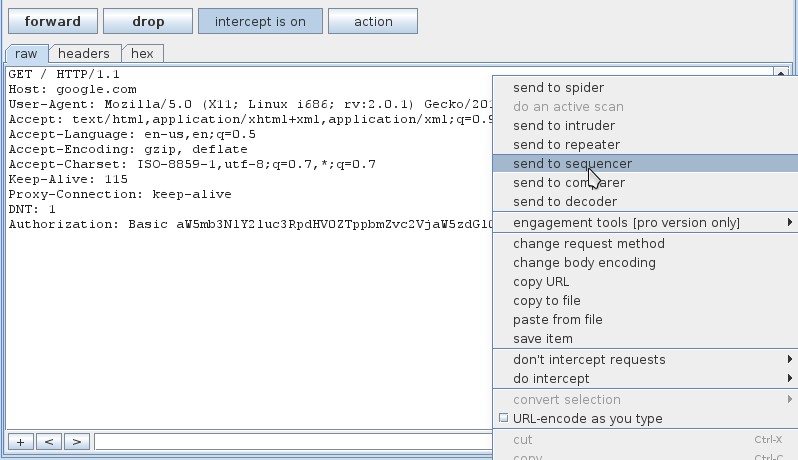
Let’s send a request that returns a session token to the Sequencer. Right click on the request and click on Send to Sequencer.
In sequencer we can see that it automatically identified the ID parameter. We can also use manual selection to select it ourselves, or we can use the cookie and form field drop box to select the value which we think is the Session token.
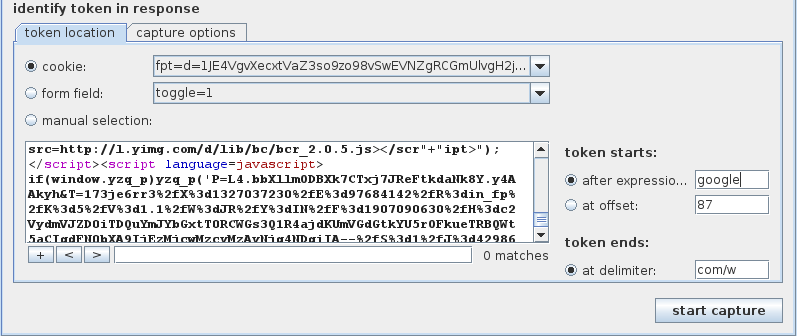
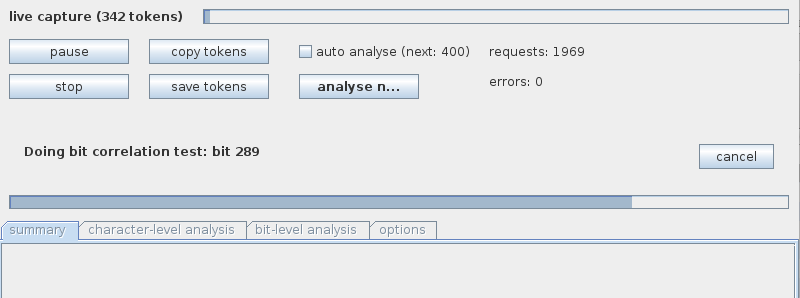
Click on start capture to start the process.
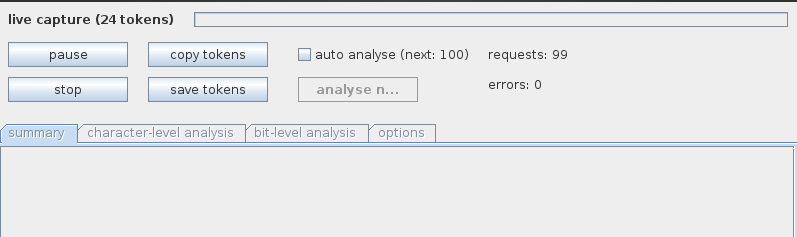
We can see the requests being made and the different tokens being received. It is good to have a sample size of atleast 100-200 tokens before starting the analysis. However, the more no of tokens, the better would be the test results. Once you think you have captured enough tokens, click on Analyze now. We will see that Burp Sequencer is now performing all the tests.
The result are displayed as shown in the figure below. As we can see in the result, the overall randomness within the sample is estimated to be excellent. You can switch between tabs to see the results of different types of analyses.
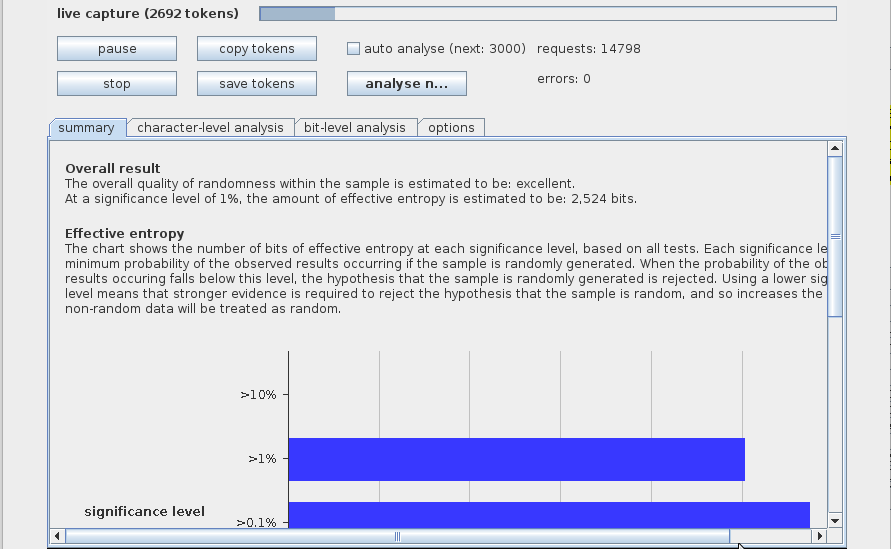
Burp Suite will still continue to capture tokens, so that you can again perform the test once you have collected some more tokens.Examining the different types of test and how they work is beyond the scope of this article. To understand how Burp Sequencer actually works, read this nice article.
6) Comparer - Burp Suite Comparer tool is used to do a comparison between 2 pieces of data, which could be requests, responses etc. We must provide the Comparer tool with 2 pieces of data in order to do that. In this case we will be giving the Comparer tool a successful response and an unsuccessful response from the brute force attack against DVWA which we carried out earlier. Make sure the response tab is selected while sending it to the comparer so that we send the responses and not the requests. Right click on an unsuccessful response and click on send to comparer, do the same for the successful response (which is the response for request #11 in the figure below).
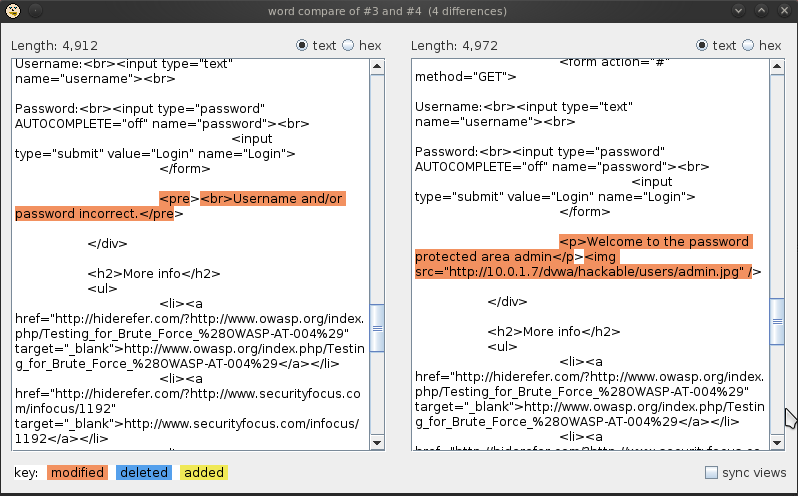
Go to the comparer tab. Here we can see the two responses which we had sent to it earlier. Click on the first response (#3) on the top half, and on the second response(#4) on the bottom half. Now the two responses have been selected to carry out a comparison between them.
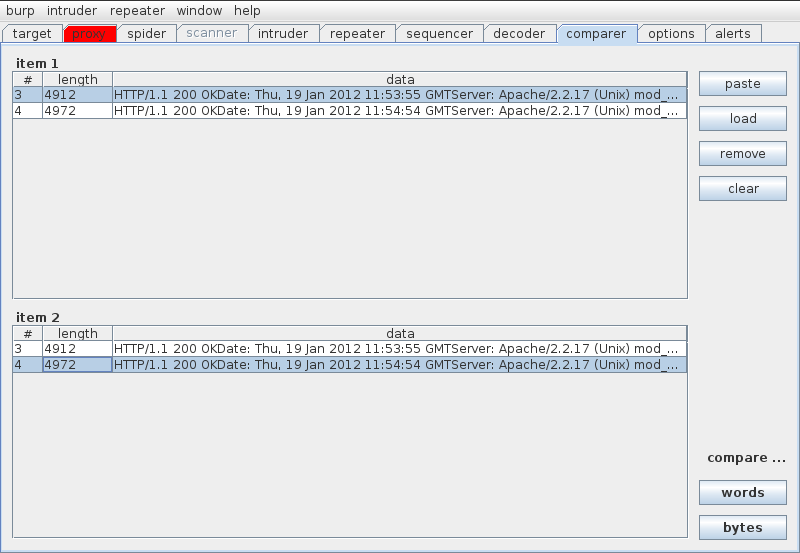
We have two ways of performing a comparison between the two responses, through words or through bytes. Click on words to perform a comparison by words. The result is pretty clear. While one response has a “Username and/or password incorrect” message, the other one has a “Welcome to the password protected area admin” message.
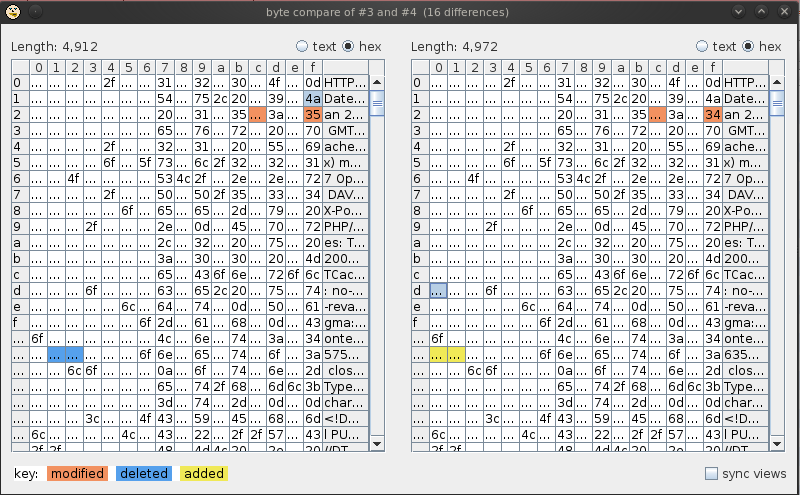
Similarly, comparing by using bytes returns the following output. By now you must have begun to understand the importance of this tool.
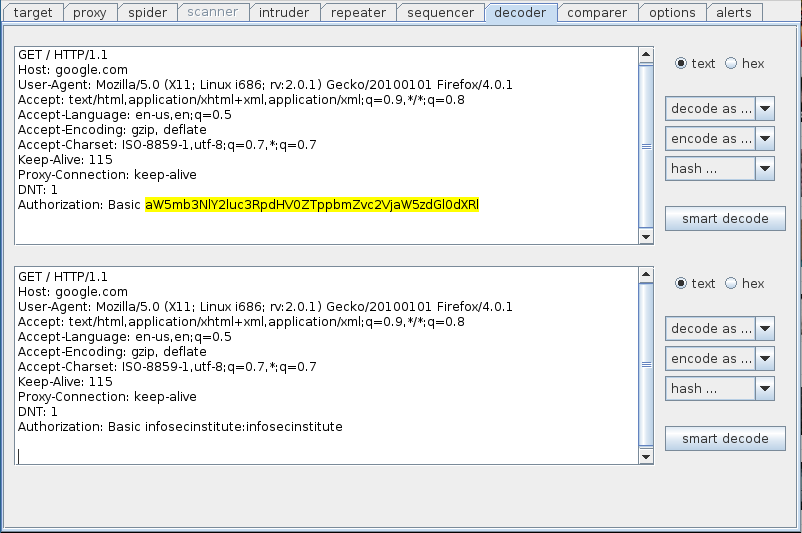
7) Decoder - Burpsuite Decoder can be used to decode encoded data to get back the canonical form, and can also be used to encode and encrypt data to get the encoded and encrypted forms. We can manually paste data into the decoder or send an encoded request to it. In this case i will be sending an HTML Basic authentication request that contains the username and password in base64 encoded form to the decoder. Right click on the request and click on Send to Decoder
Highlight the encoded form and click on decode as and then click on base64
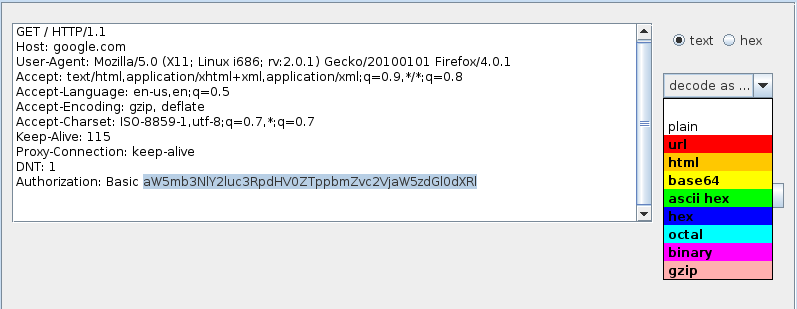
Burp Decoder decodes the base64 encoded string and gives us the username/password in plaintext.
You should check out the Smart Decode feature too in burpsuite, in which Burp decoder intelligently guesses the encoding used and decodes it. Though it is not fully reliable and some mistakes might occur.
8) Scanner - Burp Scanner is one of the most powerful web application scanners. Though, like any other web application scanner, it is not perfect and some false positives may occur. Burp Scanner is not available with the free edition. You can find more information about Burp Scanner here.
Conclusion
In this article we looked at almost all the popular features of Burp Suite like proxy, scanner, sequencer, repeater, etc. The extent to which it can be helpful in Web application testing is only up to the imagination of the user which makes it a valuable tool for web application testing.
References
-
PortSwigger Website
http://portswigger.net/burp/ -
Hacking Web Authentication - Part 1
http://resources.infosecinstitute.com/authentication-hacking-pt1/ -
Burp Sequencer 101
http://blog.portswigger.net/2008/05/burp-sequencer-101.html -
Burp Scanner
http://portswigger.net/burp/scanner.html
This article was originally published on the resources page at Infosec Institute. For more information, please visit my author page.