
Hacking Web Authentication – Part 1
Authentication is the process of validating something as authentic. When a client makes a request to a web server for accessing a resource, sometimes the web server has to verify the user’s identity. For that the user will have to supply some credentials and the web server validates it. All subsequent decisions are then taken on the basis of the credentials supplied by the client. This process is called Authentication. Once the user is authenticated, the web server sets up the appropriate permissions for the user on it’s resources. Whenever the user tries to access a resource, the server will check if the user has appropriate permissions to access the resource or not. This process is called Authorization.In this article we will look at some of the common types of authentication used these days, discuss the vulnerabilities in them, and then move on to some attacks against these authentication types.
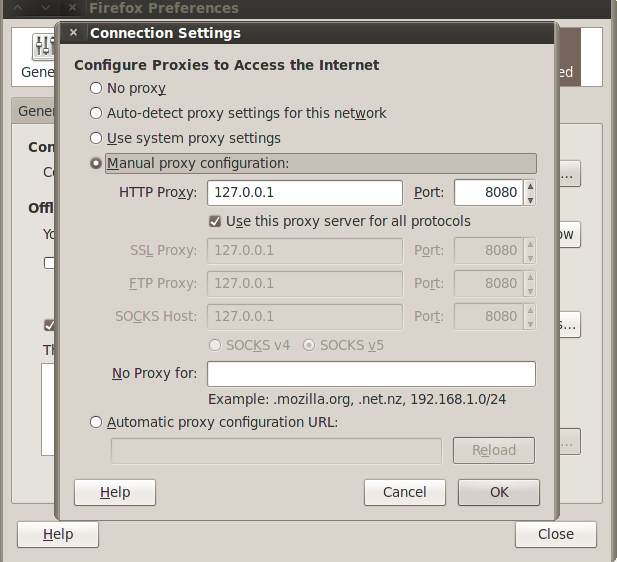
Please note that we will be using Burpsuite in this article for analyzing the requests sent through. Burpsuite is available by default in Backtrack. In order to intercept the requests and manipulate them, we must configure our browser to use Burp’s proxy, which is 127.0.0.1:8080 by default. We will also be using Wireshark a bit.
Once this is done, open up Burpsuite, go to Proxy–>Intercept and make sure Intercept is on.
 ˜
˜
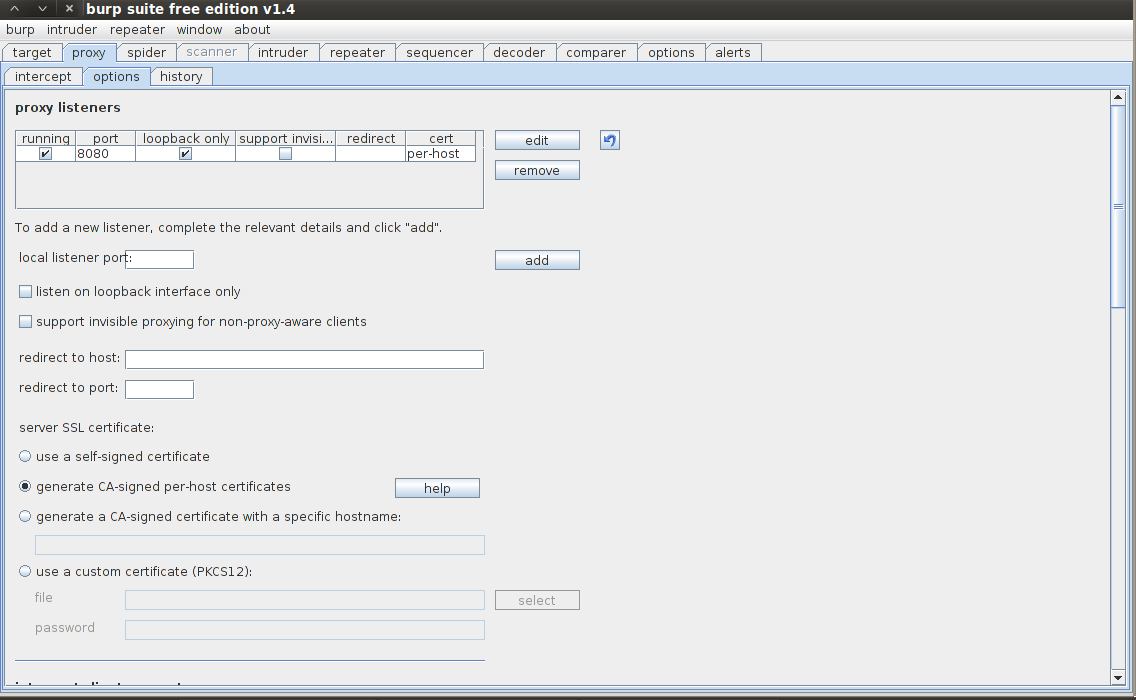
Now go to the options tab and check to see if the proxy is listening on port 8080. Also make sure “Generate CA-signed per-host certificates” option is checked. Each time the user connects to a SSL protected website, Burpsuite will generate a server certificate for that host, signed by a unique CA certificate which is generated in Burpsuite during it’s installation. The purpose of this is to reduce the SSL errors that occur because of the proxy in between.
Now that we have set up Burpsuite and the configurations in our browser properly, we can intercept requests. Please note that whenever you send a request, it will be intercepted by Burpsuite and you will have to forward it manually. Hence it is advisable to keep “intercept is on” option checked only when you really want to see the contents of the packets going through.
Types of Authentication
1)HTTP-Basic Authentication
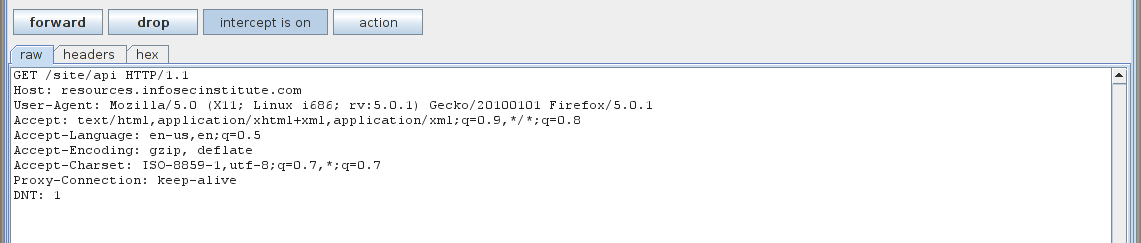
HTTP-Basic authentication uses a combination of a username and password to authenticate the user. The process starts when a user sends a GET request for a resource without providing any authentication credentials. The request is intercepted by Burpsuite and looks something like this.
The server responds back with a “Authorization Required” message in it’s header.We can see the packet in Wireshark. As we can see from the header that the authentication is of the type “Basic”. The browser is quick to recognize this and displays a popup to the user requesting for a Username and a Password. Note that the popup is displayed by the browser and not the web application.

Once we type in the username and password and intercept the request the request again using Burpsuite, we get something like this.The last line says “Authorization: Basic aW5mb3NlYzppbmZvc2VjaW5zdGl0dXRl”. This is basically the extra thing being passed in the header now. The text after Basic holds the key. These are basically the credentials in encoded form.The username and password are concatenated with a colon (:) in between and the whole thing is then encoded using the Base64 algorithm. For example, if the username is “infosec” and the password is “infosecinstitute” then the whole thing “infosec:infosecinstitute” is encoded using the Base 64 algorithm.The server then gets the header value, decodes it to get the credentials and grants access to the user if the credentials are correct. The point to note here is that it is very trivial to decode the encoded string to obtain the credentials, hence it is widely vulnerable to eavesdropping attacks.

Wireshark is able to recognize this and automatically decodes the string to reveal the credentials as shown in the figure below.
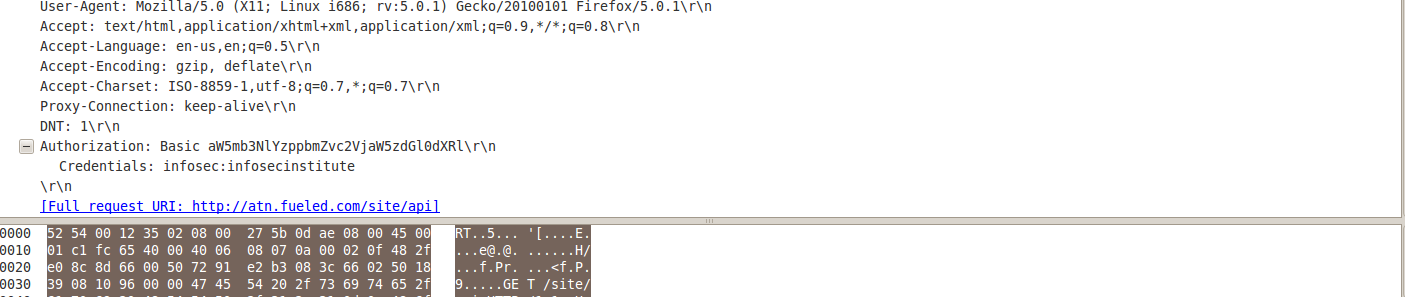
As we can see from the Credentials sections, the username and password are “infosec” and “infosecinstitute” respectively. One of the problems with HTTP-Basic Authentication is that the data is being passed over in plaintext. This risk can be removed by using SSL, which will send the data in encrypted format, and hence the value in the Authorization header will not be visible. However it will be still be vulnerable to many client side attacks, including MITM. It is also vulnerable to Brute force attacks which we will see in the coming sections.
2)HTTP-Digest Authentication
Digest Authentication was designed as an improvement over Basic Authentication. One of the major improvements with it is that the data is not passed over in cleartext but in encrypted format. The user first makes a request to the Page without any credentials. The server replies back with a WWW-Authenticate header indicating that credentials are required to access the resource. The server also sends back a random value which is usually called a “nonce”. The browser then uses a cryptographic function to create a message digest of the username, password, nonce, the HTTP methods, and the URL of the page. The cryptographic function used in this case is a one way function, meaning that the message digest can be created in one direction but cannot be reversed back to reveal the values that created it.By default, Digest authentication uses MD5 cryptographic hashing algorithm.
Digest Access authentication is less vulnerable to Eavesdropping attacks than Basic authentication, but is still vulnerable to replay attacks, i.e if a client can replay the message digest created by the encryption, the server will allow access to the client. However to thwart this kind of attack, server nonce sometimes also contains timestamps. Once the server gets back the nonce, it checks its attributes and if the time duration is exceeded, it may reject the request from the client. One of the other good things about Digest access authentication is that the attacker will have to know all the other 4 values (username, nonce, url, http method) in order to carry out a Dictionary or a Brute force attack. This process is more computationally expensive than simple brute force attacks and also has a larger keyspace which makes brute force attack less likely to succeed.
3)Form Based Authentication
Form Based Authentication uses a form (usually in html) with input tags to allow users to enter their username and password. Once the user submits the information, it is passed over through either GET or POST methods via HTTP or HTTPs to the server. On the server side if the credentials are found to be correct, then the user is authenticated and some random token value or session id is given to the user for subsequent requests. One of the good features about Form Based authentication is that their is no standardized way of encoding or encrypting the username/password, and hence it is highly customizable which makes it immune to the common attacks which were successful against HTML Basic and Digest Authentication mechanisms. Form Based authentication is by far the most popular authentication method used in Web applications. Some of the issues with Form based authentication is that credentials are passed over in plaintext unless steps such as employment of TLS (Transport Layer Security) are not taken.
Let’s see an example of Form based authentication. We will be using DVWA (Damn vulnerable web application) for our exercise as we will be using the same for carrying out a brute force attack against Form based authentication. DVWA can be downloaded from here.
Once you have downloaded and installed it, login with the default credentials {admin/password} and click on the Brute Force tab on left side and click on View Source to view the source. Please note that the Security level is set to high in my case. As we can see the form accepts the username and password, validates it to remove any sort of special characters which could be used to perform SQL injection, and then sends it over to a sql query where the credentials are checked against the database to see if they are correct or not.

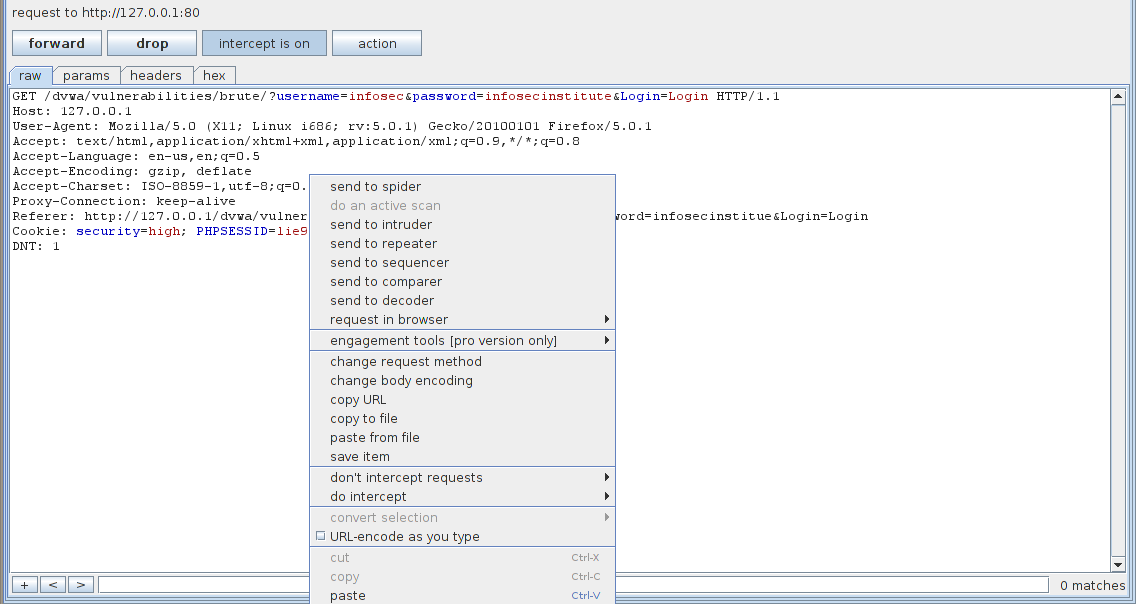
let’s input any username/password and intercept the result using Burpsuite. Here is what it should look like in your case.

Attacking Web Authentication
In this section we will be carrying out a bruteforce attack against form based authentication for Security level “High” in Dvwa. Please note that brute force attacks may not work in all cases. In some cases websites will start rejecting your requests after some specified number of unsuccessful tries. Also some websites may use CAPTCHA to validate if a human is indeed making the request or not.
To carry out a brute force attack, we will be using the intruder feature in Burpsuite. Some of the things required for this attack are a list of common usernames and passwords. Go to the form and submit a request using any username/password for now, then intercept the request. Once you have the request, right click on it and click on “send to intruder”
This will send the request information to the intruder. Go to the intruder tab. Now we will have to configure burpsuite to launch the brute force attack.Under the target tab, we can see that it has already set the target by looking at the request.

Go to the positions tab now, here we can see the request which we had previously sent to intruder. Some of the things are highlighted in the request. This is basically a guess by Burpsuite to figure out what all things will be changing with each request in a Brute force attack. Since in this case only username and password will be changing with each request, we need to configure Burp accordingly.
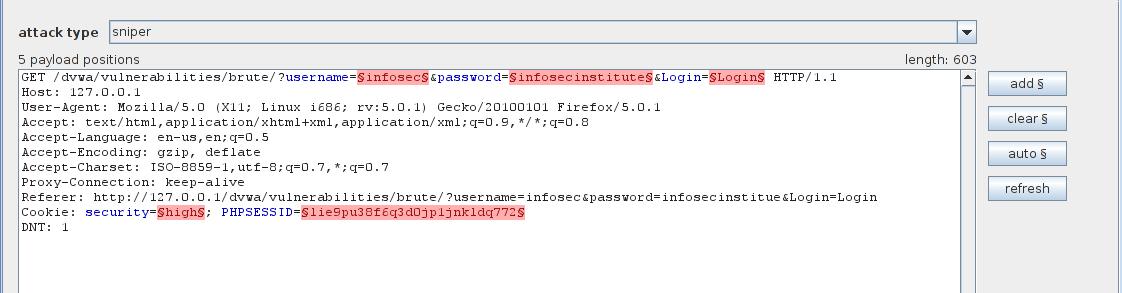
Click on the clear button on the right hand side. This will remove all the highlighted text, now we need to configure Burp to only set the username and password as the parameters for this attack. Highlight the username from this request (in this case “infosec”) and click on Add. Similarly highlight the password from this request and click on Add. This will add the username and password as the first and second parameters. Once you are done, your output should look something like this.

The next thing we need to do is set the Attack type for this attack, which is found at the top of the request we just modified. By default it is set to Sniper. However in our case we will be using the Attack type “Cluster Bomb”. For more details on which attack is suitable for which scenario, please read Burp’s documentation. Basically the idea of cluster bomb is to use Multiple payload sets (1 for username and 1 for the password), the attack will start by trying all the values in Payload 1 with first value in Payload 2, then by trying all the values in Payload 1 with second value in Payload 2 and so on. As we can see from the image below, our attack type is set to “Cluster Bomb”.

Go to the payload tab, make sure payload set 1 is selected, click on load and load the file containing a list of usernames. In my case i am using a very small file just for demonstrations purposes. Once you load the file all the usernames will be displayed as shown in the image below.

Similarly select payload set 2, click on load and load the file containing a list of passwords.

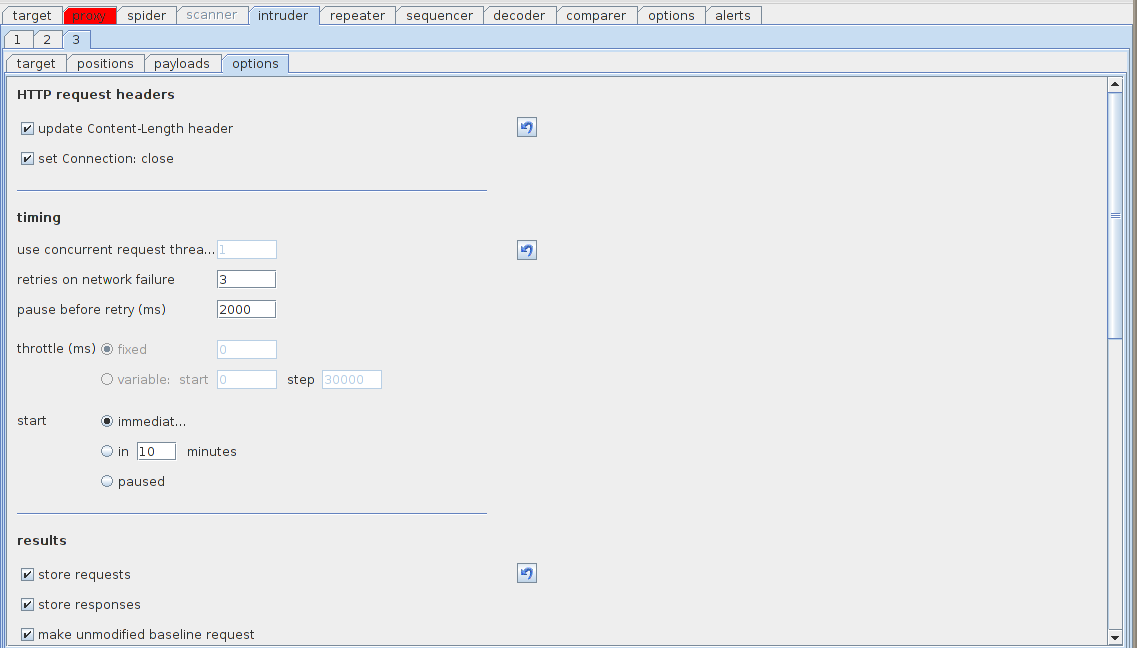
Go to the options tab now and make sure “store requests” and “store response” options are set under results. Have a look at all the options and see if you need or don’t need any of these options.
All right we are now set to launch our attack. Click on intruder on the top left and click on “start attack”. We will see a windows pop up with all the requests being made. So how do we know which request is successful. Usually a successful request will have a different response than an unsuccessful request or will have a different status response. In this case we see that the request with the username “admin” and the password “password” has a response of different length than the other responses.
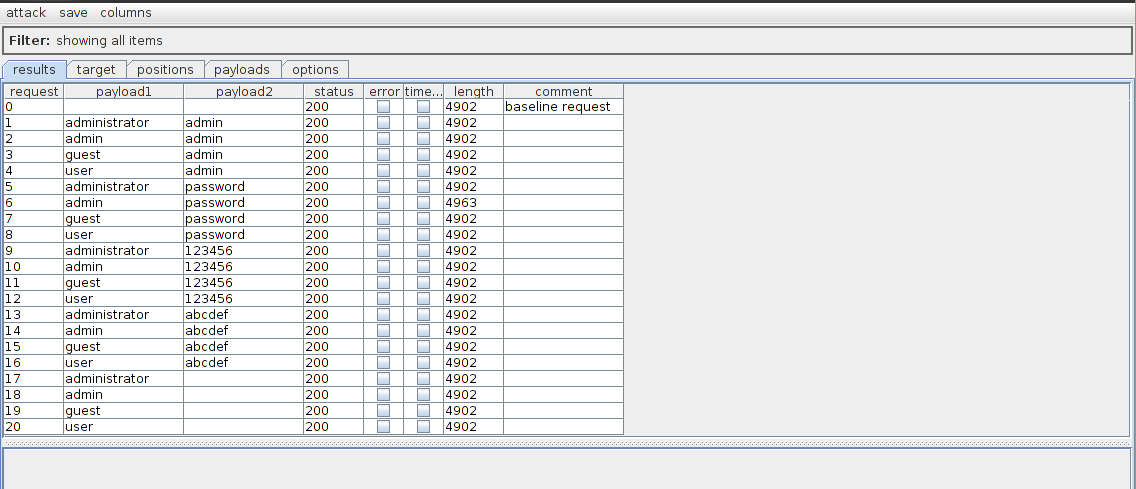
Let’s click on the request with a different length response. If we click on the response section, we see the text “Welcome to the password protected area admin” in the response. This confirms that the username/password used in this request is the correct one.

Conclusion
In this article we discussed some of the common authentication methods used, the vulnerabilities in these authentication methods and then looked at different ways to attack them. However this is just a part of the story. In the recent years, many other authentication mechanisms have been developed, including use of “One Time passwords”, “Digital Certificates” and use of external authentication service providers like Open ID. Several other attacks which have not been discussed in this article are Session Stealing, Cookie stealing, Cross Site Request Forgery and SQL Injection. We will be discussing all these in the next article.
This article was originally published on the resources page at Infosec Institute. For more information, please visit my author page.